Getting started with JSF 2 (and Maven)
I use Apache Trinidad at work and since JSF 2 is now final I decided to play with it a bit.
Of course this is going to be the classic Hello World example (as there are many other like this around the web).
First you need to setup a simple Maven project.
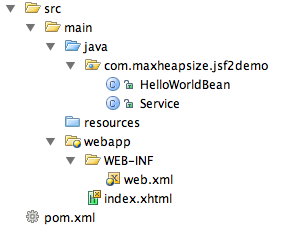
The file layout should be something like that.
 After that change your pom.xml to include the servlet and jsf2 libs.
<project xmlns="http://maven.apache.org/POM/4.0.0" xmlns:xsi="http://www.w3.org/2001/XMLSchema-instance"
         xsi:schemaLocation="http://maven.apache.org/POM/4.0.0 http://maven.apache.org/maven-v4_0_0.xsd">
  <modelVersion>4.0.0</modelVersion>
  <groupId>com.maxheapsize</groupId>
  <artifactId>jsf2demo</artifactId>
  <packaging>war</packaging>
  <version>1.0-SNAPSHOT</version>
  <name>jsf2demo Maven Webapp</name>
  <url>http://maven.apache.org</url>
  <dependencies>
    <dependency>
      <groupId>com.sun.faces</groupId>
      <artifactId>jsf-api</artifactId>
      <version>2.0.0-b13</version>
      <scope>compile</scope>
    </dependency>

    <dependency>
      <groupId>com.sun.faces</groupId>
      <artifactId>jsf-impl</artifactId>
      <version>2.0.0-b13</version>
      <scope>compile</scope>
    </dependency>

    <dependency>
      <groupId>javax.servlet</groupId>
      <artifactId>jstl</artifactId>
      <version>1.2</version>
    </dependency>

    <dependency>
      <groupId>javax.servlet</groupId>
      <artifactId>servlet-api</artifactId>
      <version>2.5</version>
    </dependency>

  </dependencies>
  <build>
    <finalName>jsf2demo</finalName>
  </build>

  <repositories>
    <repository>
      <id>maven2-repository.dev.java.net</id>
      <name>Java.net Repository for Maven</name>
      <url>http://download.java.net/maven/2</url>
    </repository>
  </repositories>

</project>
First we are going to create the managed bean to hold the name we are going to enter.
package com.maxheapsize.jsf2demo;

import javax.faces.bean.*;
import java.io.Serializable;

@ManagedBean
@SessionScoped
public class HelloWorldBean implements Serializable {

  private String name = "";

  @ManagedProperty(value = "#{demoService}")
  private Service service;

  public String getName() {
    return name;
  }

  public void setName(String name) {
    this.name = name;
  }

  public void setService(Service service) {
    this.service = service;
  }

  public String getReverseName() {
    return service.reverse(name);
  }
}
To demonstrate the dependency injection with JSF 2 I use a service to reverse the name. Simply add the @ManagedProperty with the name of the service and it will get injected. Of course we need the service. Here it is:
package com.maxheapsize.jsf2demo;

import javax.faces.bean.*;

@ManagedBean(name="demoService")
@ApplicationScoped
public class Service {

  public String reverse(String name) {
    return new StringBuffer(name).reverse().toString().toLowerCase();
  }
}
Very simple…isn’t it ?
The only thing what’s missing is the web.xml and the webpage itself.
The web.xml is pretty straight forward and should not show any surprises.
<!DOCTYPE web-app PUBLIC
    "-//Sun Microsystems, Inc.//DTD Web Application 2.3//EN"
    "http://java.sun.com/dtd/web-app_2_3.dtd" >
<web-app>
  <display-name>Web Application</display-name>

  <servlet>
    <servlet-name>Faces Servlet</servlet-name>
    <servlet-class>javax.faces.webapp.FacesServlet</servlet-class>
    <load-on-startup>1</load-on-startup>
  </servlet>

  <servlet-mapping>
    <servlet-name>Faces Servlet</servlet-name>
    <url-pattern>*.xhtml</url-pattern>
  </servlet-mapping>

  <context-param>
    <param-name>javax.faces.PROJECT_STAGE</param-name>
    <param-value>Development</param-value>
  </context-param>
</web-app>
The index.xhtml has some differences from earlier versions of JSF. First, JSF now supports Ajax out of the box. To have this enabled you need to load the jsf.js javascript library. The inputText tag binds to our managed bean and includes an f:ajax tag. This tag determines which part should be rerendered (in this case the element with the id reverseName). F:ajax will execute on value holding components always with an ‘onchange’ event and on action components (like commandButtons) with an ‘onclick’ event. The output will trigger the injected service in our managed bean and return the reversed input string.
<!DOCTYPE html PUBLIC "-//W3C//DTD XHTML 1.0 Transitional//EN"
        "http://www.w3.org/TR/xhtml1/DTD/xhtml1-transitional.dtd">

<html xmlns="http://www.w3.org/1999/xhtml"
      xmlns:ui="http://java.sun.com/jsf/facelets"
      xmlns:f="http://java.sun.com/jsf/core"
      xmlns:h="http://java.sun.com/jsf/html">

<h:head>
  <title>JSF Demo</title>
</h:head>
<h:body>
  <h:outputScript name="jsf.js" library="javax.faces" target="body">
</h:outputScript>
  <h1>Ajax JSF 2 Demo</h1>
  <h:form>

    <h:inputText id="name" value="#{helloWorldBean.name}">
      <f:ajax render="reverseName"/>
    </h:inputText>

    <h:commandButton value="Say reverse Hi via Ajax">
      <f:ajax execute="name" render="reverseName"/>
    </h:commandButton>
    <h:outputText id="reverseName" value="#{helloWorldBean.reverseName}"/>
  </h:form>

</h:body>
</html>
 And that’s it. Sure it’s a simple example, but so far I do like the minimal configuration and the ajax integration.
